DIY – Satin Shabby Firework Headband by Ana

diybyanaana_05142013

Hi! My name is Ana. I am an elementary school teacher by day and mother to two daughters by night. After all is quiet, I look forward to taking out my craft materials to make hair accessories. I loved the colors used here…perfect for Spring! For my older daughter, I just used an alligator clip to match the baby who will wear the elastic hairband. This is SUPER easy and fun to make!

05142013_1

Items needed:

1. DIY package from iBetterAccessorize.com including (1) Delicate Satin Rae Flower, (1) Shabby Chic Chiffon Frayed Flower, (1) 2 inch Felt Circle, (1) 25mm Rhinestone Button Firework and (1) 1/4 Inch Stretch Headband
2. hot glue gun with glue sticks
05142013_3
1. Using a small amount of hot glue, glue the netting down to the back of the peach flower.
2. Using enough glue to fill the center of the rhinestone, glue the stone to the middle of the cream flower.
05142013_4
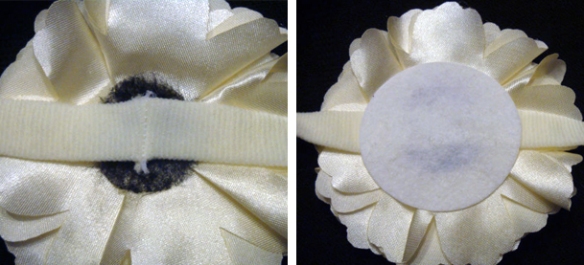
3. Glue the cream flower on to the hairband by the closure so that it is hidden. Turn it over and then glue the white circle to the back.
05142013_5
4. Glue the peach flower on to the hairband close to the cream flower. Turn it over and then glue the white circle to the back of the flower. Make sure that you glue the flowers close together because the elastic stretches when worn and you want the flowers to be close.
05142013_6
Enjoy all the compliments!!!
Love this accessory and want to make one of your own? 

Purchase all 6 pieces for only $5.15 + s&h by visiting iBetterAccessorize.com – you choose the color of the flowers!  You can find the direct link here: Ana’s Satin Shabby Firework Headband Pack

Want to be our next DIY Mom Blogger?  Contact us today for more information: sales@iBetterAccessorize.com

DIY – Double Peacock Feather Headband Pack by Stacey

diybystacey

IMG_2327[1]

Items needed:

1. From iBetterAccessorize.com: (2 peacock feathers, glitter elastic, a felt circle and a cluster rhinestone button)
2. hot glue gun with glue sticks
3. needle and thread
4. scissors
04022013stacey_2
Step 1- With a hot glue gun, glue the ends of the elastic band together. I also put a stitch on the ends just to make it extra secure. This step is completely optional.
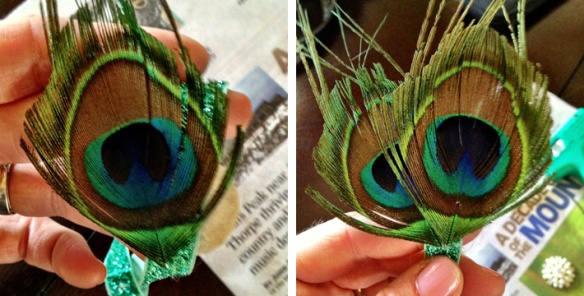
Step 2- Using a scissor, I cut the peacock feathers down to a smaller size.
04022013stacey_3
Step 3- Flip the elastic band over, and where you would like to glue your items, using the hot glue gun, glue the felt circle on the back. This will help create a base to glue on your items.
Step 4- (This step is optional) Cut down the tops of the peacock feather to have more of a molded fit. I did this step because the feathers were too long for my daughters head. I left some longer strands on there to give it more of a dramatic look.
04022013stacey_4
Step 5- Hot glue one of the peacock feathers onto the front side of the headband where you place the felt circle.
Step 6- Attach the second peacock feather.
04022013stacey_5
Step 7- Where the peacock feathers meet at the bottom, glue on the rhinestone,
For the final step I just touched up the peacock feather by cutting off the longer strands that I had left on earlier.

Love this accessory and want to make one of your own? 

Purchase all 5 pieces for only $7.80 + s&h by visiting iBetterAccessorize.com – you choose the color of the flowers!  You can find the direct link here: Stacey’s Double Peacock Feather Headband Pack

Want to be our next DIY Mom Blogger?  Contact us today for more information: sales@iBetterAccessorize.com

DIY – Flower Me Headband by Heather

diybyheatherIphone 2 094

Hi, My name is Heather Tate, I am a stay at home mom of 2 beautiful girls. I also run an online boutique called Cute Expressions, where I make and sell lots of cute items for your little ones. I enjoy arts and crafts, its more than a hobby its my life. Here is my tutorial on what I call the Flower Me headband, I hope you love it as much as my girls do.

03182013_1

Items I used:

  • Block Slider Rhinestone Letter – 3/8
  • 1.4″ Felt Circle
  • Birdcage Veil Russian Netting 1/2 Yard (You Choose Color)
  • 4″ Satin Pinwheel Flower (You Choose Color)
  • 1/2 Yard Glitter Elastic (You Choose Color)
  • Glue gun or E6000
  • Scissors
  • Thread
  • Measuring Tape/Ruler

03182013_2

To start off measure the glitter elastic, to the length you need (see size chart). Take the glitter elastic and place glue onto one end where the glitter is, take the other end and place the elastic side on top of the glitter side(see photo) hold in place and let glue dry (be careful hot glue really burns).  Take your satin flower and place glue on top of the connected glitter elastic and hold in place, let glue dry. Flip the connected flower and elastic over. Take the felt circle and place glue over one side. Take the felt circle and place it on the back end of the connected flower and glitter elastic(see Photo) Press and hold and let glue dry. Place to the side.

03182013_3

Take the Purple birdcage veil and the scissors, cut a 3 inch by 2 inch U shape out. Take the thread and cut about 6 inches of thread. Gather the top part of your U shaped purple veil and bunch it up. Take the thread and wrap it around the top of the U shaped purple
veil (see photo). Take the glue gun and place a few dabs of glue in the center of the flower. Place the thread wrapped veil on top of the glue dabs. Add glue to the top of the thread wrapped veil and add your initial. Press and hold the initial until glue is dry, if using E6000 use a metal clip to hold the initial in place. If you have strings of glue left once its done, take a blow dryer and lighter go over the flower, this will make the glue strings go away.

Nikon camera 016

Love this accessory and want to make one of your own? 

Purchase all 5 pieces for only $7.80 + s&h by visiting iBetterAccessorize.com – you choose the color of the flowers!  You can find the direct link here: Heather’s Flower Me Headband

Want to be our next DIY Mom Blogger?  Contact us today for more information: sales@iBetterAccessorize.com

DIY – Rosette Bow Rhinestone Letter and Netting Headband by Tarin

diybytarin

My name is Tarin and I am a stay-at-home mom to 2 boys age 4 and a little baby girl 7 months old. I love being able to create things that no one else has for my children. When I came across iBetterAccessorize I thought it was a great way to be able to create a headband for my daughter at a great price.
03042013_1
The supplies from iBetterAccessorize.com that I used were (1) ivory headband, 1) rhinestone letter, (1) rosette bow ivory color, (1) piece of ivory netting (1) felt circle and Fabri-Tac glue.
03042013_2
So the first thing I did was cut the piece of netting in half. I then took the felt circle and folded it in half. Take the Tac glue and spread on half of the folded felt and then scrunch the bottom of the netting. Place the scrunched end of the netting on the side of the felt without glue and then fold the felt in half so that it the netting is now glued inside.
03042013_3
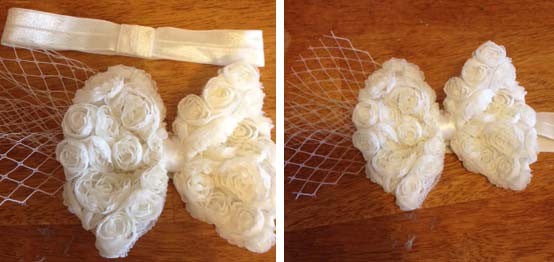
Next you’ll take the back side of the bow and place glue in the center of the bow and glue it to the felt piece. Now glue the bow to the headband by gluing the felt directly to the headband. The final step is to glue the Letter on to the bow. I placed it directly in the center of the bow but you can place it inside the bow on a rosette if you would like as well.
03042013_4
 This was the easiest project I have ever done!!
Love this accessory and want to make one of your own? 

Purchase all 5 pieces for only $7.50 + s&h by visiting iBetterAccessorize.com – you choose the color of the flowers!  You can find the direct link here:  Tarin’s Rhinestone Letter Bow Headband Pack

Want to be our next DIY Mom Blogger?  Contact us today for more information: sales@iBetterAccessorize.com

DIY – Peony Feather Fascinator Headband by Romy

diybyromyromy_1

I’m a 29 yrs old stay at home mom whose a proud mommy of 3 (2 boys and a girl). My sons are 4 and 3 and my princess is 20 months old. Since becoming a mommy, I’ve become super crafty. I started with scrap booking, then to party decorations and cakes and now hair bow making. So I decided to make it into a business. I was very excited to do this blog and I hope you all enjoy!

romy_2

The accessories you’ll need from iBetterAccessorize.com are as follows:
Birdcage veil Russian netting 1/2 yard
3″ Rhinestone Peony flower
Satin cover plastic headband
2″ felt circle
Marabou feathers pk of 3
The items from home are:
Glue gun
Measuring take
Scissors
romy_3
Start with measuring the netting to 4×4 inches and cut. Then fold square in half and trim one corner (the open side) about an inch in. Then trim the other open corner about 1/2 an inch in.
romy_4
Then place flower facing down and put the netting (the shorter width side) at the half way mark (where the stitches are) and glue. Place the Marabou feathers on the opposite side of the netting, spread open to cover about 1/4 of the flower and glue. Now, place the head band on the flower (keeping in mind of what side you want the netting to be on, I chose the left side) and glue. Then, apply more glue and place the felt circle over it. And you’re done!
romy_7
I hope you enjoyed this as much as I did! 🙂

Love this accessory and want to make one of your own?

Purchase all 5 pieces for only $7.19 + s&h by visiting iBetterAccessorize.com – you choose the color of the flower, netting, feathers and headband!  You can find the direct link here: Romy’s Peony Feather Fascinator Headband Pack

Want to be our next DIY Mom Blogger?  Contact us today for more information: sales@iBetterAccessorize.com

DIY – Double Satin Mesh Flower Headband by Priscilla

My name is Priscilla. I am a stay at home mom and full time student. I will receive my associate’s degree in Early Childhood Development in December of this year. I have been married for 10 years. My husband and I have 2 daughters, ages 6 and 9. We are very involved in school and the community. We enjoy activities like cheerleading, soccer and Girl Scouts. When I’m not busy rushing the girls back and forth, I like to tinker and create! I recently started a FB page with my sister-in-law where we get to showcase our talent. I love to make custom hair bows and accessories! I like to consider myself a small business owner. Each and every one of my pieces has my heart and soul in it.

Items needed:

1. From iBetterAccessorize.com: (red satin mesh flower, black and white satin mesh flower, 2 felt circles, 1/4″ black elastic)
2. hot glue gun with glue sticks
3. needle and thread
4. scissors
5. lighter or candle

First you’ll want to measure your elastic. I am making my headband to fit a child, so I will cut it to a 17″ length. You can take the elastic and gently stretch it around the person you’re making it for if you’d like. After you cut the elastic, you’ll want to use a lighter or candle to seal the edges. This will prevent the elastic from fraying and make your piece more durable. You don’t need to put the elastic directly in the flame, but close enough so you can see the edges curl and seal.  After you’ve heat sealed both edges, you’ll need the needle and thread. You want to straighten and untwist the elastic and next, you’re going to overlap 1/2″-1″ of each end.

Keep the ends together and thread the needle through both pieces of elastic several times. I’ve used a contrasting color thread so you can see the stitching of the elastic. After you’ve stitched the two ends together, you’ll need to cut the thread and tie a knot. Now you’ll take the red flower and place it under the seam you just created. You’ll want to run a thin bead of hot glue on the felt pad on the flower. Attach the elastic to this line of hot glue.  Add hot glue to the felt pad again so you can attach a second felt pad for stability.
With the hot glue in place, add a felt circle. Repeat this process with the black and white flower.  You now have a finished satin and mesh flower headband.  I hope you enjoy making your headband as much as I enjoyed creating it!
Love this accessory and want to make one of your own? 

Purchase all 5 pieces for only $3.50 + s&h by visiting iBetterAccessorize.com – you choose the color of the flowers!  You can find the direct link here: Priscilla’s Double Satin Mesh Flower Headband Pack

Want to be our next DIY Mom Blogger?  Contact us today for more information: sales@iBetterAccessorize.com